Showing posts with label Upgrade. Show all posts

Wednesday, October 13, 2021

⚡peed boost

 A mighty new 48 V battery (13S4P Super Shark from EM3ev) has been powering the Firefly for the past 150 800 km.  Voltage means speed, and this leaves the 36 V original in the dust.  It's worth mentioning that 13 series cells exceed the motor controller spec, but an internet post said it was ok.
😉


The hole-pattern gods must have been smiling on me, because the new battery mounting rail fits the existing bolt holes exactly.  I did add a pair of large c-washers behind the rail, to distribute load onto the plastic part.

Frame mounting holes and back of battery rail.
The small washers are unused.

One of two c-washers between frame and plastic.  Without them, the raised metal rectangles at the bolt holes (prev. picture) would probably crush the small overlapping areas of plastic (less than 1 mm wide).

Aside from a galloping speed and oodles of range (about 70 60 km), the battery broadcasts more status information than most people care to know.  In a nod toward reason, I spliced four series diodes into the charge cable, limiting the Voltage to 52 V (80 % charge).  The Super Shark's higher mass and speed cause extra mechanical stress - inspect regularly!  More weight on the front wheel does help traction.

BMS Monitor shows battery status and cell voltages (via Bluetooth).  The BMS circuit prevents unsafe voltage, current (?) and temperature, and shuffles charge between cells to equalize their voltage.


Saturday, August 29, 2020

VESC (motor controller)

In a new attempt at Field Oriented Control, a VESC (Vedder Electronic Speed Controller) drove the Firefly's motor wheel for the past 500 3000 or so km.  As before, wiring up the new controller took some effort, but this one is more satisfactory.

Positive:
  • Software and firmware are open source.  It was easy to add automatic "cruise control" that saves thumb strength.  After 7 seconds of holding the right throttle high, it stays high until brake is applied.  The system is experiment-friendly.
  • The right throttle drives forward.  The left throttle brakes and drives backward. [customized code from district9prawn].  Now there is a good balance between left and right thumbs.
  • Custom features can be programmed such as a limp-home mode in case of throttle / brake-sensor failure.  Safety checks (i.e. full engagement of the attachment clamps) can also be requested through the phone app before enabling higher speeds (some programming required).
  • Torque-control is sweet.  No more annoying braking due to minor unintentional throttle movements.
  • FOC is super smooth.
  • No violent synchronization jerk when reengaging the throttle after coasting.  This may stop has stopped self-loosening of the axle nuts.
  • The phone app logs data from the controller, inertial unit, and phone GPS (10 Hz rate).
Notable:
  • Parameter settings and speed display are through Bluetooth and a phone app (screenshot below).  This allows for nice graphics and on-the-fly adjustment, but sunlight readability is low. The controller also runs fine without the phone. 
  • The VESC 6 is spec'd for 60 V max, which doesn't allow for common 48 V (13S) e-bike batteries.
    Update: A 48 V (13S) battery does work.
  • No headlight connection.  I had already been using a Cateye AMPP800 that is brighter than the stock headlight (which I removed).
  • The VESC firmware code is complex and only sparsely documented.
Issues to be addressed:
  • Weatherproofing.  As is, the controller is unlikely to survive a rainstorm and needs a protective enclosure.
  • At above-normal speed (e.g. descending a hill), the motor brake can kick in very hard, possibly blowing the battery fuse and causing other damage.  I can probably avoid this by modifying the firmware.  For now I have to avoid the motor brake when coasting fast downhill.
  • No odometer.  This is important for periodic maintenance.  I keeping a spreadsheet that adds up individual trip distances added this feature to the code.  


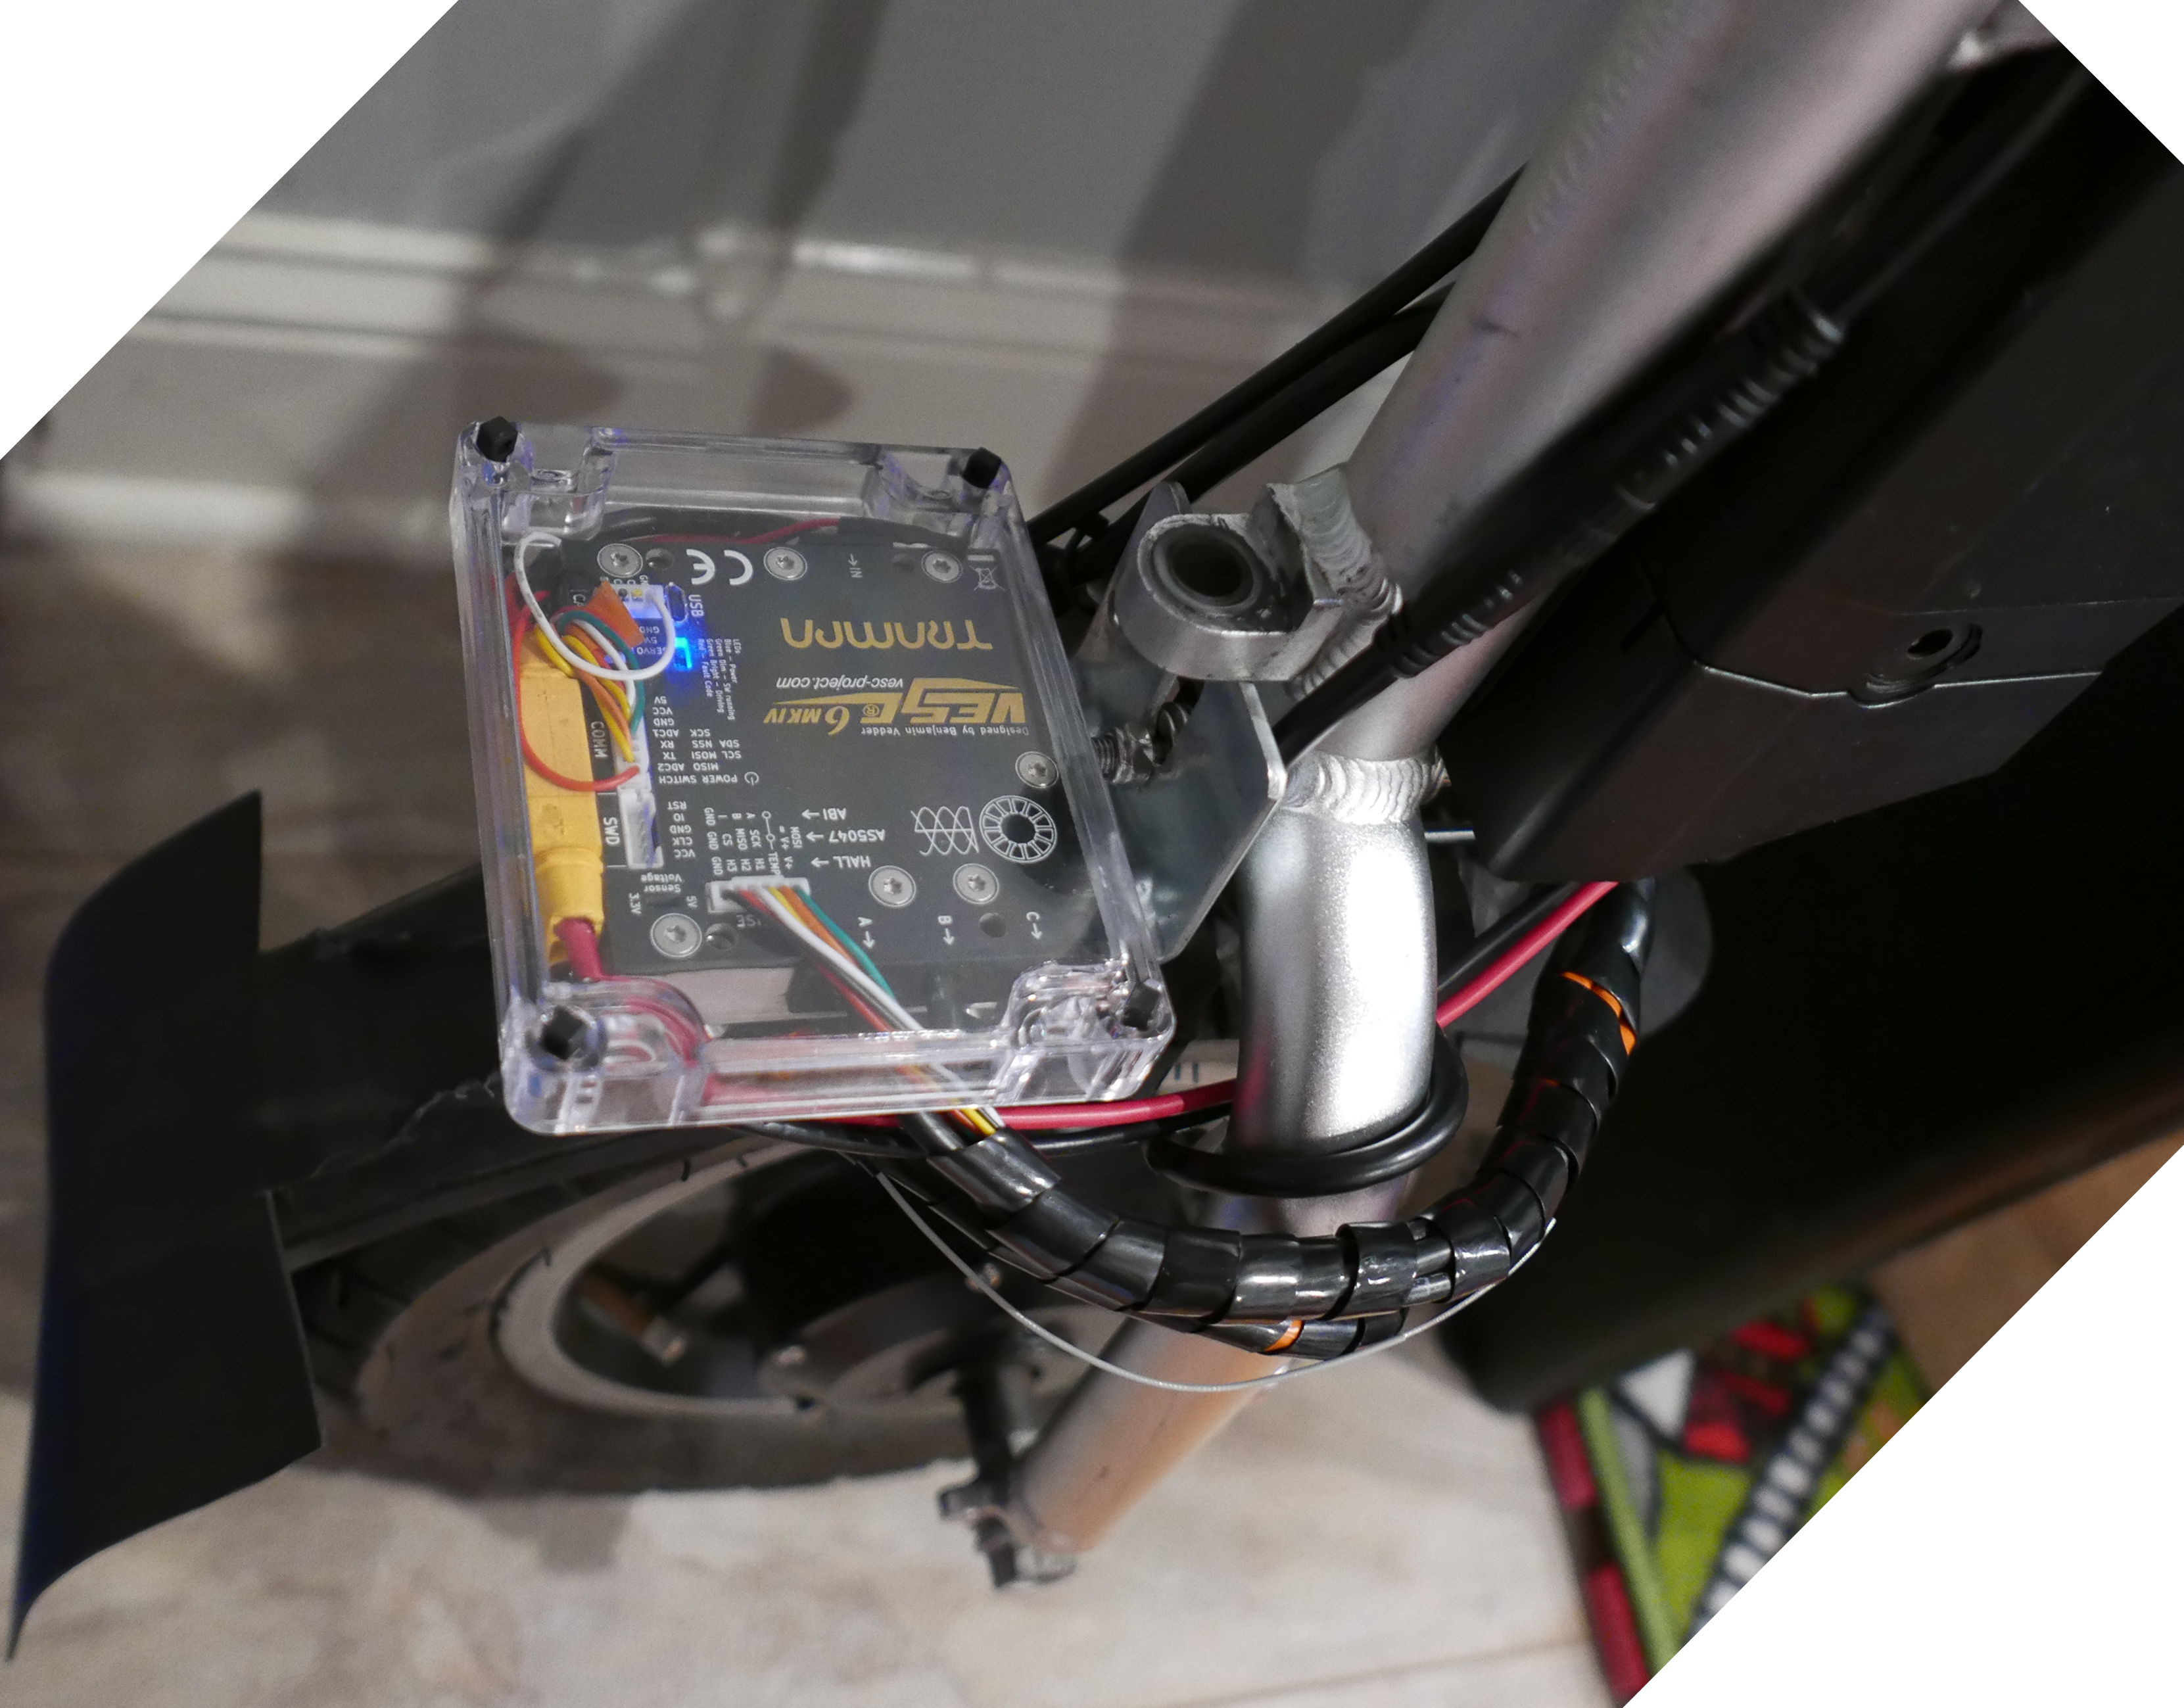
The VESC (which has threaded mounting holes) attaches to the battery base via two M5 screws after drilling matching holes in the base's metal bottom plate.  After a bunch of wire splices, the motor connects to the Z910 cable and the Firefly signal harness to a hard-to-find 9-pin JULET connector (JL-F-Z911AT, Thanks Mr. Wen!).  By keeping the original JULET connectors, I can easily swap back the stock controller which sits in a different battery base.  For VESC, the battery connects through yellow anti-spark XT90 connectors (I still got occasional sparks).  On top is the Bluetooth comm unit with dangling gray antenna.


October 16, 2020 Update:

A sturdy clear lid with overhang now protects from rain and shows LED status.  The other main ingredients were an L-bracket that clamps to the VESC via the threaded M5 holes (lucky fit), and longer M6 screw for the fork.  Some cable junctions and the Bluetooth module can still get wet, but at least the main controller is shielded.  As they say, the perfect is the enemy of the good.


Wednesday, August 19, 2020

Disc brake

Alas, sometimes we must stop.  The disc brake has good strength, but often caused strong brake judder that seemed to get amplified by a resonance.  At times, it felt like riding a washing machine full of bricks during spin cycle.
😰
A long-ago attempt at improvement involved swapping the stock brake caliper with an Avid BB7 MTB, but that just made the brake noisier.  Women would turn because they thought someone was whistling at them, but it was just brake squeal. 
😗
More recently, I replaced the brake rotor (140 mm diameter) with a $10 "ZENO" part.  This rotor, together with new "Resin Organic Semi-Metal Brake Pads" make the brake smooth and quiet.  After installation, I bedded-in the new pads and disc.  Now there's no more judder or brake squeal!
😇
The original disc was a little warped, and I suspect it had periodic variations in braking friction that got amplified in a flexing resonance.  The resonance seemed to get worse with front tire deflation.

Thursday, April 23, 2020

3000 km, KT-LCD3 display, etc.

Spring flowers are blooming, the sun is shining, and I've started putting distance onto the Firefly again.  It's important to get outside, despite the many warnings about COVID-19 from politicians and public health busybodies.  Their science is tentative and fraught with conflicts of interest, and their claims - hypocritical as they may be - of valuing safety above all else do not reflect my values.  Fear, i.e. focusing on worst-case-scenarios, is a choice that I reject.  Life is for living.

I'm using a new KT-LCD3 display, which works as a drop-in replacement for the original KT-LCD5 after setting the various parameters.  The LCD3 shows power in Watts, which maxxes out at about 550 W for me.  I really wanted to know the maximum power.  The display also shows ambient and motor temperature, but unfortunately the motor field does not measure anything, and the ambient value is inaccurate.

Update: After this post I reverted to the original LCD5 display and spooled the LCD3 odometer distance onto it, using the documented communications protocol.


Together, the old (2730.5 km) and new (273.6 km) odometers add to 3004.1 km and 286.1 hours for the following statistics:
  • 2 years ownership
  • Several hundred trips enabled by the Firefly
  • Scores of friendly compliments
  • 10.5 km/h (average speed)
  • 3 worn out front tires (current one seems like a winner)
  • 2 significant mechanical issue:
    • Loose axle nut
    • Shims for the wheelchair frame attachment are slippery.  If used, inspect regularly and check bolts for tightness.
  • 3 tip-over accidents (sideways)
    • Turning onto an uphill ramp.  Too much speed and off-camber.  Kind bystanders tipped me back up.
    • Riding up a steep and narrow temporary ramp, losing traction near the top, fishtailing backwards, and tipping over the side.  Relying on momentum rather than traction to get up steep slopes is dangerous.  The result of not reaching the top can be an extended loss of control, because sliding friction is less than static friction.  Rear wheel braking could help, because the rear wheels have a lot more traction (but engaging them while moving backwards could make the vehicle flip).  Reversing up steep slopes can be safer.
    • While going around an illegally parked truck.  Always cross drop-offs at a perpendicular angle, even when annoyed.
  • 1 empty battery (later replaced with a larger one)
  • 1 flat rear tire (from a thumb tack)
  • 1 flat front tire
  • 0 collisions
Tip-over accidents are a recurring theme, because any safety gains due to skill and experience seem to be cancelled out by higher speed and reduced caution.

Tuesday, September 24, 2019

New motor controller

The Firefly's motor controller (pictures below) energizes the motor coils in the right sequence to move the wheel according to the throttles.  It sits in the battery base and appears to be a variant of the S06 controller (schematic here) with second (reverse) throttle input.


For the past 65 km, I've been testing the more advanced Baserunner controller from GRIN and ASI in Canada.
Firefly with Baserunner taped to the side of the 11.6 Ah battery.  The rat's nest of wires near the bottom allows it to function (no speed display, headlight, and brake cut-off though) and the toggle switch between the handlebar and LCD selects forward/reverse direction.

The Baserunner is a lot smoother than the original controller due to its Field-Oriented Control algorithm, which the physicist in me appreciates.  FOC also allows about 15 % higher speed, and the Baserunner can integrate with higher voltage batteries to go even faster.

Other impressions:
  • Makes the motor nearly silent, but the controller emits a slight high pitched whine.
  • Torque-mode control is nice.  
  • While maintaining speed at low torque, there is often a bit of chatter between zero and a little torque.  Perhaps my thumb is unsteady on the throttle.
  • Sometimes the motor stutters when starting to move.
  • Re-engagement is much smoother.  The old controller often gave a nasty kick when re-engaging the throttle after coasting (while still moving), but Baserunner re-engagement is silky smooth.
  • I disabled regenerative braking and just use the mechanical brakes.   The efficiency cost is minimal, and this will be easier on the axle and dropouts, because motor torque reversal is much less frequent.  I dislike how the original controller applies motor braking for every little throttle decrease, because I generally want the Firefly to  pull forward (or push backward) when pressing the throttle and will pull the brake levers to slow down. 
Although the Baserunner has a Z910-type connector that the existing motor plugs into nicely, the rest of the Firefly doesn't connect so easily.  I obtained a special 9-pin JULET connector pigtail (JL-F-Z911AT, Thanks Mr. Wen!) to interface the Firefly signal wiring harness with the Baserunner's modular connectors, but there is only one throttle input and an extra toggle switch is needed to reverse direction (this reverse signal required customization at ebikes.ca because standard Baserunners do not expose it).  The Baserunner also doesn't communicate fully with the handlebar LCD and has no headlight connection or brake cut-off.  I've been customizing a microcontroller to address these shortcomings (and add new features), and will update the blog when there is more.

Update (10/30/2019): The Baserunner expects an extra 4th Hall sensor (that the Firefly motor doesn't have) to output speed information.  I'm moving on, to try a different Field-Oriented Controller (controller & driver).

Monday, February 18, 2019

Battery boost


The Firefly gets its zip from the Lithium-ion battery.  Here are some tips:

To reduce cold-induced low-voltage cut outs, set parameter C12=0 (28 V).  See the S-LCD3 manual for information on various parameters, and how to change them.  This sacrifices some margin of safety. so keep your eye on the voltage display and try not to drain the battery below 33 V (at rest).  This is based on the following experience, which I believe was due to increased battery resistance at low temperature:

I rode a fully-charged Firefly to visit a friend where the distances were 10 km out and 7 km back. While there, I left the Firefly outside in 30 F weather. On the return trip, the unit cut out repeatedly. At first while climbing hills, but later on flat terrain. The display flashed an empty battery symbol and the motor went dead. After a few seconds, it would recover. At some point, I started watching the battery voltage on the display, and the cut-outs occurred at about 30 V. Final resting voltage was 35.4 V.

According to internet wisdom, keeping the battery fully charged for long periods reduces its lifespan.  But Micah Toll writes (he also has a website) that it should be fully charged "occasionally" to balance the individual cells.  Whether trying to maximize the battery lifespan is even worthwhile depends on personal circumstances.

The original battery (at least mine) is a 36 V, 6.6 Ah THUNDER-DT from a company in Kunshan, China called Reention (formerly ksreention).  DT stands for down-tube, the intended mounting location on a bike.
Rendering (ssztec) of the original battery with 30 cells (green).  The circuit board (blue) probably holds the battery management system (BMS).  

It turns out that Amazon lists a larger (taller) battery from the same manufacturer that fits the original receptacle.  [Update: AliExpress lists higher capacity models that are less expensive.]  Mine was rated for 11.6 Ah and upon receipt, I measured 11.85 Ah (see graph below).  This battery contains 40 cells (4 parallel x 10 series), and I believe the type is Panasonic NCR18650PF Samsung (perhaps 29E) with 2900 mAh capacity.

One notable difference is that the new battery always generates output voltage at the contacts and the pressing the "power" switch just shows the charge level.  On the old battery, this switch turned the battery output on and off.
Discharge test through a precision 75 Ohm resistor (red line) and battery voltage vs. distance traveled (blue circles) over several days.  The final range of 33.9 km is almost twice the original.  Energy efficiency is about 22 km/MJ, which is quite high.

To swap batteries, it is necessary to replace the original mounting rail with the longer one that accompanies the new battery.  While the taller battery will fit onto the original rail and can be taped to the frame for testing, it won't lock into place.
  1. First unlock the old battery and remove it from the rail.  
  2. Then remove the rail from the steerer tube (four 4 mm Allen screws)
  3. Remove the battery base with all the wires from the rail (two 4 mm Allen screws) and leave the base hanging off the Firefly.  This box houses the motor controller that drives current through the motor.  
  4. Attach the new, longer rail (which comes with the battery) first to the controller box and then the Firefly. 
  5. Slide the new battery onto the rail and lock it in place.
Voilà, the Firefly range is almost doubled!

Summer, 2020 update:  About 3500 km later, the battery is going strong with about 40 km range.  At one point, a loose contact caused intermittent cutouts.  This was solved by taping the battery to the steering tube rather than relying on the rail lock.  Here are pix of the innards.


Fall, 2021 update:  After about 5000 km, the battery started cutting out and I replaced it.

Sunday, December 16, 2018

Mud flap

Dirt, water and leaves were being sprayed up by the Firefly wheel. Especially the wheelchair's flip-back footrest mechanism was catching a lot of wet debris. The picture shows some of the schmutz after it dried (a lot already fell off and made a mess at home).

So I super-glued and taped a rubber sheet (cut to L x W: 5.25" x 5", 1/16" thick) to the fender. The mudflap is effective, and after many trips with plenty of wet leaves, nothing new has stuck to the footplate.  It reduces the open tire aperture to less than 1 inch from about 3.5 inches.  Because the material is flexible, ground-contact is not a problem.  In the photo, the bottom of the tape (2" wide Polyken) corresponds to the fender bottom. 


2/19/2019 Update: The link at the top shows pictures with a mudflap. So the manufacturer has either added one since mine was made, or removed it since the photos were taken.

Sunday, November 18, 2018

Headlight location

Days have gotten shorter, and how should we pierce the inky blackness?  With a headlight of course, which the Firefly's designers helpfully included.  But the original location, so close to the ground was not ideal, and the battery above forced a near horizontal beam direction.  The shallow angle illuminated the ground in front poorly, and rudely shone up into people's faces.  For illumination and civility, it's better to place the light higher up and direct it downward.

Placing the Firefly's lamp higher, required disconnecting its HIGO connector and unscrewing from the mount.  Then I cut the cable halfway between connector and lamp, to splice in a few feet of extension (without crossing the wires).  Finally, I took an attachment clamp from an old bike reflector, to mount the lamp higher on the steerer tube.  Now the light is still weak and oddly blue, but it makes a useful bright spot, and shouldn't bother passersby.  The old light location is a good spot for a front reflector.

Tools and supplies needed:
  • Old bike reflector
  • Old USB cable for extension
  • Wire cutter / stripper
  • Soldering iron
  • Heat shrink
  • Electrical tape
  • Phillips #2 screwdriver

September, 2020 update: At some point, I removed the stock headlight and have been relying on a handlebar-mounted Cateye AMPP800.  It is important to point the light downwards, to avoid blinding oncoming pedestrians.

Sunday, October 14, 2018

Need for speed

Speed kills, but it also thrills.  The converse is also true:  Slow is safe, but oh-so-frustrating.  My manual wheelchair travels slowly because steering is problematic, shoulder power is limited, and obstacles abound.  Amazingly, the Firefly electric front wheel attachment solves these problems.  Power at the wheel is up to 350 Watts, similar to a professional bicyclist and over 10 times more than most people can get out of their shoulders.  The handlebar allows for proper steering, and the longer wheelbase improves handling on non-ideal surfaces, which are almost all of them in my city.  It brings out the joy of riding something fast, which must have been etched into our DNA long ago.

With speed and power comes danger!  Go too fast through a turn or cross a drop-off at an angle, and you gain a new appreciation for the tippiness of high center-of-gravity tricycles.  Someone more adventurous than me has maybe perfected the technique of balancing on two wheels to corner fast without the need for body English.  Hopefully they were wearing elbow pads.
Credit: Martin Pettitt originally posted to Flickr as Race Of Champions (CC BY 2.0)

But even straight-line speed is fun and helps eat the miles if you're going somewhere.  My first impression of the Firefly was that it's pretty darn slow.  Releasing the wheelchair's rear brake locks helped (duh), as did reading the instructions to understand that the device starts in 1st "gear", which has a low speed limit.  Setting the "gear" to 5 raises the top speed to 20 km/h (12 mph), already pretty fast if you're travelling on a sidewalk.  That's still an artificial restriction, which can be removed by adjusting the LCD controller.  Then the limit comes from the motor and battery voltage, and a fully charged battery reaches 24 km/h (14 mph).

There is a saying about all-wheel-drive cars, that they just get you to your accident faster.  Be that as it may, it would be nice to go faster than 24 km/h on smooth and clear pavement.  One option is the Phaserunner motor controller whose manual describes "Field Weakening for Speed Boost".  Apparently, the motor coils can be energized in a tricky way to gain 15-20 % in speed, at the expense of battery drain and maybe motor stress.

The Firefly's motor controller is a circuit board inside the battery base that is connected to the wiring harness.  All of those connections will make it hard to replace.  In the end, it might be more effective to replace everything (motorized wheel, the battery and maybe controller) with higher voltage parts that can go faster.  Update:  internet comments claim that most 36 V motors can operate with 48 V batteries.  I'm curious if anyone has done this already.  This could be a good project for the winter when I'm snowed in.  The cat's meow would be to also drive the rear wheels.

Thursday, October 4, 2018

Parking brake

My Firefly came with a button on the right brake lever that you could press to hold the brake for parking.  This feature is great, because you can stand the Firefly up in a corner when not in use, or set the brake at a traffic light and use both hands for your phone, to dig in your bag, etc.  This is also a safety feature, because once the parking brake is engaged, accidental throttle activation has no effect.  But after about 500 km (300 miles), the button broke, and all of the parts scattered around!
What's left of the original brake-hold button.  The spring is missing and the bottom head broke off.

So I contacted the manufacturer (Rio Mobility), and they wrote that others were having the same problem, and their "solution" was to remove the brake-hold feature!  No warranty fix is possible.  I can sympathize, since the company probably doesn't want to be in the brake-lever engineering business.

But I have an affinity for mechanics, and giving up on this little bit of sweetness was not so satisfying.  Clearly, the button breaks because every time you release it, a spring causes it to pop up and smack into the brake housing with large peak forces.  The poor button can't withstand the repeated violence, and the part fails.  This seems like a design flaw, but most users of these brake levers are on bicycles or recumbents, and they won't use the brake-hold enough to cause failure during the warranty period.

After some experimenting, I ordered a replacement brake lever (Sun BL46K) for $13 that includes a brake-hold button.  This has a slightly higher quality feel than the original, but the brake-hold mechanism appears to have the same not-so-good design.

Fortunately there is a simple fix!  You can take a small cushioning washer like McMaster 93650A100 and stretch it over the bottom of the brake-hold part like a rubber band.  Now the brake lever can last a long time, because the peak forces that caused the part to fail are much lower.  Feature restored!

The red oval shows where the cushioning washer (which is transparent) was stretched over the bottom of the brake hold button.

Update (October, 2021):  Over 6000 km later, the brake-with-rubber-washer works as well as ever.  This page will be updated if a problem develops.