Tuesday, September 24, 2019

New motor controller

The Firefly's motor controller (pictures below) energizes the motor coils in the right sequence to move the wheel according to the throttles.  It sits in the battery base and appears to be a variant of the S06 controller (schematic here) with second (reverse) throttle input.


For the past 65 km, I've been testing the more advanced Baserunner controller from GRIN and ASI in Canada.
Firefly with Baserunner taped to the side of the 11.6 Ah battery.  The rat's nest of wires near the bottom allows it to function (no speed display, headlight, and brake cut-off though) and the toggle switch between the handlebar and LCD selects forward/reverse direction.

The Baserunner is a lot smoother than the original controller due to its Field-Oriented Control algorithm, which the physicist in me appreciates.  FOC also allows about 15 % higher speed, and the Baserunner can integrate with higher voltage batteries to go even faster.

Other impressions:
  • Makes the motor nearly silent, but the controller emits a slight high pitched whine.
  • Torque-mode control is nice.  
  • While maintaining speed at low torque, there is often a bit of chatter between zero and a little torque.  Perhaps my thumb is unsteady on the throttle.
  • Sometimes the motor stutters when starting to move.
  • Re-engagement is much smoother.  The old controller often gave a nasty kick when re-engaging the throttle after coasting (while still moving), but Baserunner re-engagement is silky smooth.
  • I disabled regenerative braking and just use the mechanical brakes.   The efficiency cost is minimal, and this will be easier on the axle and dropouts, because motor torque reversal is much less frequent.  I dislike how the original controller applies motor braking for every little throttle decrease, because I generally want the Firefly to  pull forward (or push backward) when pressing the throttle and will pull the brake levers to slow down. 
Although the Baserunner has a Z910-type connector that the existing motor plugs into nicely, the rest of the Firefly doesn't connect so easily.  I obtained a special 9-pin JULET connector pigtail (JL-F-Z911AT, Thanks Mr. Wen!) to interface the Firefly signal wiring harness with the Baserunner's modular connectors, but there is only one throttle input and an extra toggle switch is needed to reverse direction (this reverse signal required customization at ebikes.ca because standard Baserunners do not expose it).  The Baserunner also doesn't communicate fully with the handlebar LCD and has no headlight connection or brake cut-off.  I've been customizing a microcontroller to address these shortcomings (and add new features), and will update the blog when there is more.

Update (10/30/2019): The Baserunner expects an extra 4th Hall sensor (that the Firefly motor doesn't have) to output speed information.  I'm moving on, to try a different Field-Oriented Controller (controller & driver).

Wednesday, July 10, 2019

RPM measurement

I wanted to check motor speed (revolutions-per-minute or RPM) independently of the built-in speedometer.  For this, the Firefly can be laid horizontally on a bench with the wheel free to move.  A video camera records the movement and white tape around half of the wheel eases analysis.


Video processing (via Octave) yields a graph of the speed:
The raw signal is the average pixel brightness in a rectangular region covering the tire, for each video frame (60 Hz frame rate).  This signal is shifted to have near-zero mean (blue curve), and the zero-crossings (red dots) are found.  Two zero crossings correspond to exactly one wheel rotation, and their time-difference determines motor speed (RPM). For 36.0 V the no-load speed is 383.7 rpm.

During this test, the battery produced 36.0 V, and the display showed 21.8 km/h.  This implies a wheel circumference of 21800/383.7/60 = 0.947 m, which is only one percent less than my measurement of 0.958 m.  Conclusion: The built-in speedometer is accurate.

Analysis code

The motor (probably a high-RPM, 12" wheel version of the Q100 at BMS battery) contains 16 poles (8 pairs) and has a reduction gear ratio of 8.2.  Confirming these numbers is that parameter P1 = 131 in the LCD setup (8.2 x 16 = 131.2). Therefore, the commutation speed or eRPM for a fully charged battery is 8*8.2*383.7*41.8/36=29200.

Tuesday, July 2, 2019

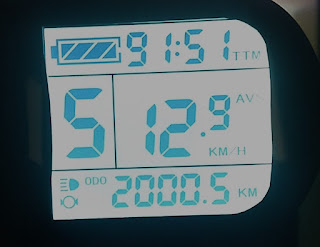
2000 km (1243 miles)

This milestone (kilometerstone?) occurred a few weeks ago.

Other numbers:
  • 442 days (ownership)
  • Several hundred trips enabled by the Firefly
  • 191 hours, 51 minutes (total time).  The hundreds digit is not shown in the display.
  • Scores of friendly compliments
  • 10.4 km/h (average speed)
  • 3 worn out front tires (current one seems like a winner)
  • 2 significant mechanical issue:
    • Loose axle nut
    • Shims for the wheelchair frame attachment are slippery.  If used, inspect regularly and check bolts for tightness.
  • 2 tip-over accidents (sideways)
    • Riding up a steep and narrow temporary ramp, losing traction near the top, fishtailing backwards, and tipping over the side.  Relying on momentum rather than traction to get up steep slopes is dangerous.  The result of not reaching the top can be an extended loss of control, because sliding friction is less than static friction.  Rear wheel braking could help, because the rear wheels have a lot more traction (but engaging them while moving backwards could make the vehicle flip).  Reversing up steep slopes can be safer.
    • While going around an illegally parked truck.  Always cross drop-offs at a perpendicular angle, even when annoyed.
  • 1 empty battery (later replaced with a larger one)
  • 1 flat rear tire (from a thumb tack)
  • 0 collisions

Thursday, June 20, 2019

Axle creak

After each of the last two front tire changes, a creak developed that correlated with throttle movement (but not braking).  The creak was caused by torque-transfer from the motor.

To eliminate the creak, it was necessary to make the left axle nut (which presses on a torque-transfer washer) very tight (33 lb ft?).  Given how little material cross-section is in the axle at the left side where the electrical cable comes out, there may be danger of the axle snapping off.  Is there a recommended tightening-torque for the axle nuts?

Closer inspection of the torque transfer washer shows (see picture) that it contacts the fork dropout slot on one side but not the other.  Presumably, the use of motor braking causes the torque direction to switch, and the transfer washer rotates to contact at the other side.  After many cycles of back-and-forth torque transfer, the axle nut gets loose, and a creak develops.  

As others have discussed:
"Regen braking can slowly loosen the axle".
See also this and this thread.  They suggest using thread locker (Loctite 242) and adding washers that allow rotation between the nut and torque arm (in this case torque washer).

No fit is perfect, and the axle will have some rotation with respect to the torque transfer device. But the axle shouldn't rotate with respect to the nut, or the nut will get loose. So there needs to be differential rotation between the nut and torque washer.

To favor desired rotation (axle and nut rotate together with respect to torque washer) over undesired rotation (axle rotates with respect to torque washer and nut), we want more friction between the nut and axle (thread locker) and less friction between the nut and torque washer (add lubricated plate washers).


8/31/2019 Update:  400 km ago, I added a smooth washer between the right axle nut and dropout, and also applied Loctite 243 to that thread.  The left axle nut is tight but has no extra washer or Loctite.  The axle creak, which was coming back every 100 km or so, has stayed away.

5/13/2020 Update:  600 km after the 8/31/2019 update, I noticed that both left and right axle nuts were very loose.  The loosening and creaking problem is unsolved.  Now I am re-torquing the nuts every 150 km or so.  A new motor controller might be easier on the axle and nuts.

Fall, 2022:  After over 3000 km on the smooth new motor controller, the axle has stayed tight despite heavy regen-breaking.  For the previous loosening, I blame the re-synchronization jerk of the original controller when engaging the throttle after coast.  Despite its briefness, this always felt like the most violent part of the ride.  It stands to reason that the repeated torque impulses (about one per km) gradually loosened the axle.

Tuesday, June 18, 2019

Tire change #3 and #4

The previous Goodyear "Street" tire was showing cords after only 369 km (229 miles).  I replaced it with a heavy-duty "electric scooter" tire (QIND Q-211).  The scooter tire is a lot beefier, but the nominal size is the same, 57-203.
Initial inflation to 25 PSI caused a little tire rub (probably at the "hairs" that hang off).  Lowering the pressure to 10 PSI reduced rubbing.  Low tire pressure makes the contact patch wider, so more rubber is available to wear.  It also improves shock absorption, but raises rolling resistance (not so important) and the risk of bottoming-out (which is hard to quantify).  The operating weight of the front wheel is only 40-60 lb1 (measured with a bathroom scale) and I approach large bumps slowly, so I think low pressure is ok.
This tire was super tight to put on.  I used 12" motorcycle tire levers and also zip ties to hold the seated bead against the rim while working the tire on.
For unknown reasons, after the tire change I had to adjust the V-brake left and right spring tensions a lot to prevent brake drag.
I recommend this tire for anyone who wears out multiple tires per year and is willing to deal with a tight bead and minimal clearance.
Update: The Q-211 tire lasted 3620 km.  It ended with a gradual flat (first one) and some cords visible.  I had periodically pumped it to 20 psi or so.  At softer, more comfortable pressure, the tire and tube slowly rotate against the rim because of driving torque.  This would cause the valve stem to rip out.


1 Equals 18 to 27 % of vehicle weight, depending on upper body position. Shifting the wheelchair rear wheels backward would improve the Firefly weight distribution but degrade manual wheelchair handling.

Sunday, June 9, 2019

Door opener

Doors are difficult to operate with the Firefly on the wheelchair, because the attachment makes the wheelchair long.  After fighting with our home's entrance door one time too many, it was time to build an electric door opener.  This door has the peculiarities that:

  1. Gravity pulls it shut.
  2. The door sticks at the frame and does not fall all the way closed after cracking it open.
The opener is activated by Bluetooth remote control buttons.  It uses a motor attached to the wall to pull the door open by winding a string onto a pulley (after unlocking and cracking the door open by hand). Gravity makes the door fall shut when the motor releases the string. 

Main ingredients (total cost under $200) are:
  • Stepper motor (Sparkfun ROB-13656)
    • Pulls the door open
    • Strong enough to open the door, but weak enough to not crush people or things.
  • Motor driver (Sparkfun BOB-13752)
    • Energizes the motor
  • Raspberry Pi Zero W (MicroCenter)
    • Receives Bluetooth signals and generates motion commands
    • Talks to the motor driver via SPI.
  • NEMA23 bracket (Amazon)
    • Attaches the motor to the mounting board
  • Mounting board (Amazon)
    • A spare 10" x 10" wooden pizza peel that was in the drawer
    • Holds circuit boards and motor
  • Pulley / drum (McMaster 6245K214)
    • Let the motor wind string like a winch.
  • String (McMaster 2057T75)
  • D-ring (McMaster 3076T35)
    • Attach string to door
  • Power supply (12 V, 3 A) from unused equipment
  • Jumper wires (MicroCenter)
  • Bluetooth LE buttons
    • Initially "Scosche Tapstick"
    • Later cheap "iTAG" buttons from eBay / China
  • 5 Volt regulator (7805)
    • Power the Raspberry Pi from 12 V supply.
  • Miscellaneous: fasteners, pin headers
Some custom software on the Pi is needed to send appropriate commands to the motor driver, and dispatch these commands after receiving Bluetooth events.  So far, this system has cycled the door 476 times with only the occasional software tweak.

Saturday, April 27, 2019

Tire change #2

Old: Schwalbe Big Apple (50-203, $25)
New: Goodyear 12" Street Folding (57-203, $15)

The rubber had worn through to the light brown base material in one spot.  Schwalbe Big Apple lifetime: 515 km.

The new size has minimal clearance.  To prevent rubbing, I had to adjust the fender (loosen screw at fork, push fender away from tire & re-tighten).

Tire change steps:
  1. Flip Firefly upside down
  2. Disengage V-brake
  3. Unplug motor cable
  4. Remove disc brake (5 mm Allen wrench)
  5. Remove wheel (17 mm wrench)
  6. Let air out of tire
  7. Remove old tire with motorcycle tire irons and replace (easy peasy)
  8. Pump to 30 psi
  9. Reassemble
Note that despite its name, this Goodyear tire does not actually have a street tread, and I can't recommend it.

Monday, February 18, 2019

Battery boost


The Firefly gets its zip from the Lithium-ion battery.  Here are some tips:

To reduce cold-induced low-voltage cut outs, set parameter C12=0 (28 V).  See the S-LCD3 manual for information on various parameters, and how to change them.  This sacrifices some margin of safety. so keep your eye on the voltage display and try not to drain the battery below 33 V (at rest).  This is based on the following experience, which I believe was due to increased battery resistance at low temperature:

I rode a fully-charged Firefly to visit a friend where the distances were 10 km out and 7 km back. While there, I left the Firefly outside in 30 F weather. On the return trip, the unit cut out repeatedly. At first while climbing hills, but later on flat terrain. The display flashed an empty battery symbol and the motor went dead. After a few seconds, it would recover. At some point, I started watching the battery voltage on the display, and the cut-outs occurred at about 30 V. Final resting voltage was 35.4 V.

According to internet wisdom, keeping the battery fully charged for long periods reduces its lifespan.  But Micah Toll writes (he also has a website) that it should be fully charged "occasionally" to balance the individual cells.  Whether trying to maximize the battery lifespan is even worthwhile depends on personal circumstances.

The original battery (at least mine) is a 36 V, 6.6 Ah THUNDER-DT from a company in Kunshan, China called Reention (formerly ksreention).  DT stands for down-tube, the intended mounting location on a bike.
Rendering (ssztec) of the original battery with 30 cells (green).  The circuit board (blue) probably holds the battery management system (BMS).  

It turns out that Amazon lists a larger (taller) battery from the same manufacturer that fits the original receptacle.  [Update: AliExpress lists higher capacity models that are less expensive.]  Mine was rated for 11.6 Ah and upon receipt, I measured 11.85 Ah (see graph below).  This battery contains 40 cells (4 parallel x 10 series), and I believe the type is Panasonic NCR18650PF Samsung (perhaps 29E) with 2900 mAh capacity.

One notable difference is that the new battery always generates output voltage at the contacts and the pressing the "power" switch just shows the charge level.  On the old battery, this switch turned the battery output on and off.
Discharge test through a precision 75 Ohm resistor (red line) and battery voltage vs. distance traveled (blue circles) over several days.  The final range of 33.9 km is almost twice the original.  Energy efficiency is about 22 km/MJ, which is quite high.

To swap batteries, it is necessary to replace the original mounting rail with the longer one that accompanies the new battery.  While the taller battery will fit onto the original rail and can be taped to the frame for testing, it won't lock into place.
  1. First unlock the old battery and remove it from the rail.  
  2. Then remove the rail from the steerer tube (four 4 mm Allen screws)
  3. Remove the battery base with all the wires from the rail (two 4 mm Allen screws) and leave the base hanging off the Firefly.  This box houses the motor controller that drives current through the motor.  
  4. Attach the new, longer rail (which comes with the battery) first to the controller box and then the Firefly. 
  5. Slide the new battery onto the rail and lock it in place.
VoilĂ , the Firefly range is almost doubled!

Summer, 2020 update:  About 3500 km later, the battery is going strong with about 40 km range.  At one point, a loose contact caused intermittent cutouts.  This was solved by taping the battery to the steering tube rather than relying on the rail lock.  Here are pix of the innards.


Fall, 2021 update:  After about 5000 km, the battery started cutting out and I replaced it.